It should come as no suprise, that companies that are manufacturing receivers for the assembly of FAL type rifles, also manufacture the US parts to keep the rifles in compliance and the tools to assist in assembly. Entre'prise makes several of these parts. Lawrence Abbot of Entre'prise Arms sent me a free sample of these parts for review. My review includes comments on the cosmetics, history, comparisons, and suggested improvements, but the primary consideration should be whether or not the part performs its advertised function.
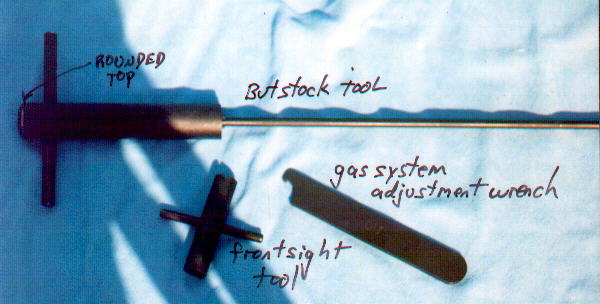
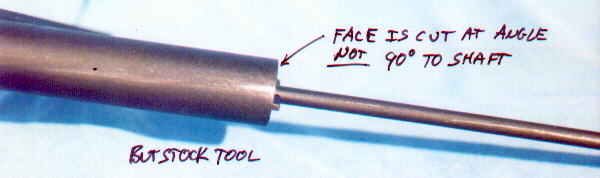
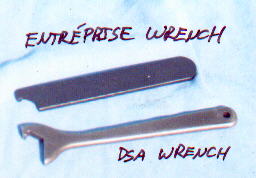
The buttstock tool is serviceable, however the example I received had the bit portion of the screwdriver machined slightly off from perpendicular. This results in uneven depth of insertion in the screw slot and puts uneven tension in the screw slot. On a normal screw, this should not be a problem, but on an unusually tight one, it could result in damage to the slot. I'd like to think such an obvious flaw is just a fluke, and not typical, but I have to assume the product sent is a representative sample. Otherwise the unit conforms to FN specifications of an 18mm handle, a 1.86mm bit width, a 4.96mm rod diameter, and a 210mm rod length - or close enough for the differences to be immaterial. The end of the handle is radiused, however a more substantial radius would increase the comfort of the tool in the palm of my hand. I could not remove the rod from the body. Entre'prise might consider having the rod thread into the body so when removed it can be used as a pistol grip screwdriver. Part is acceptable for most applications. Since I already had a perfect unit from DSA and another from Young Manufacturing, I cut the rod off, resurfaced the slot, and use it for FAL Paratrooper Model folding butstock screws.
The gas regulator wrench is of simple construction and performed fine. It conforms to the FN specification of 2.3mm tooth, although the handle construction is greatly simplified. I should note that this tool also removes the rear gas tube support or "gas cylinder bush" however if (as often is the case on StG kits) the rear support is siezed in place, attempting to hammer on the wrench handle will destroy the sharp 90 degree angle required on the spanner. The bush should be removed with heat and a heavy punch struck downward in a counterclockwise direction. I would like to see a hole drilled in the handle so I can either hang it on a pegboard or attach it to a tool "keychain" like the Israelis do - small tools are easily lost in the field. Part performs as advertised.
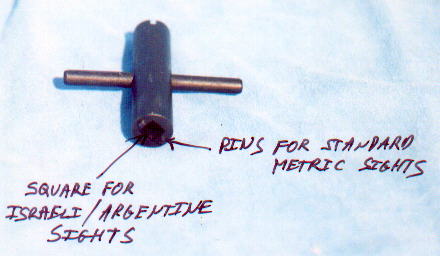
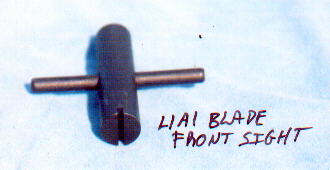
The front sight tool is unique. One side is for the L1A1 blade sight, the other has two pins for the standard metric and also a square broach for the Israeli/Argentine sights. The tool fits all three sights well. I'd like to see the T-handle made larger with the ends cut into screwdriver blades for the rear sight. I'd like to see a method for attaching it to a hook or dummy cord. I'd like to see the square broach a bit deeper to grip more of the sight. I think its too shallow for turning sticky sights without damaging them. Part performs as advertised and is quite handy.
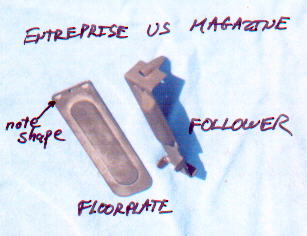
The magazine floorplate and follower are perfect duplications of the original. Too perfect, in my opinion, to NOT be marked "US." The follower is indistinguishable from the original. The floorplate can possibly be differentiated by the angle of the perforations at the rear. These appear more triangular than a Steyr, but there are a dozen variations from different countries, and there may be one that matches the EAI perfectly. Parts are excellent and perform as advertised.
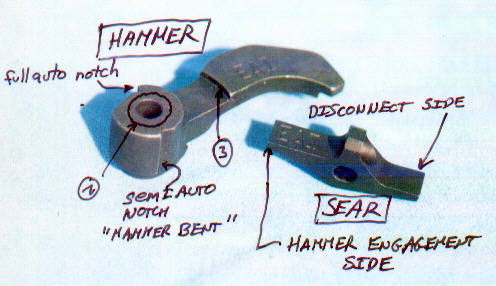
I dropped the hammer into an otherwise original StG-58 lower. It functioned fine. It is clearly marked with "EAI." The marking is clean and deep, apparently a laser engraving. It appears to be a casting from the porosity on the left side, however also has marks indicating it was machined. Perhaps a combination of the two. The hammer retains the full auto notch, which is good as the notch performs two functions. The first is to engage the safety sear on full auto or safe (but not approved by ATF) semiauto fire. The other is to catch the hammer in its forward motion and prevent it from moving so far forward as to launch the hammer spring and plunger, as in an L1A1. Entre'prise claims the hammer and sear are heat treated to RC 35. In comparison, Derek Huffman of Arizona Expert Arms checked some other parts with a Tsubosan Scratch Hardness Tester (range 40-65 RC in 05 point increments) and found the following. Austria: hammers 50-55; triggers below 40; sears 45-50. DSA: hammers 55-60; triggers 60-65 (?); sears 45-50. Israel: hammers 55-60; triggers below 40; sears 50-55. British: hammers 50-55, triggers below 40; sears 40-45. I have no opinion on whether these variations have any practical affect on function.
I dropped the sear into an otherwise original StG-58 lower. It functioned fine. The sear is clearly marked on the underside in the same manner as the hammer. It is also lightly hand-scratched "EAI" on the top. It appears to be machined. It has a slightly different contour on the inside of the sear plunger recess than a Steyr, but not significant. It appears to be machined and black-oxide coated, as compared to the DSA sear which appears to be machined, parkerized, and then finely ground on the engagement surfaces. Both hammer and trigger produced a slightly heavier trigger pull than the original Steyr parts. I cannot at this time evaluate the long-term wear characteristics of these parts.
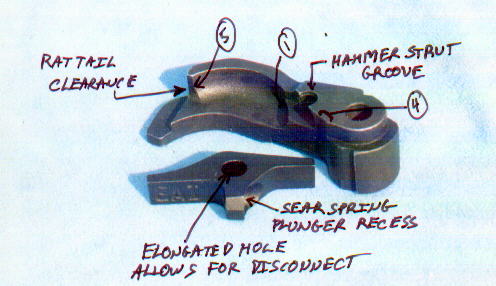
I used the hammer in conjunction with the sear and the weapon functioned fine. On removal from the upper, I noticed that when depressing the trigger and manually pressing the hammer to the rear, it stuck in the rearward position and did not pop back up to engage the sear as the original hammer-sear combination did. This previously was characteristic of CAI hammers where the groove for the hammer strut was at an incorrect height. I do not have a means of measuring the inside of this groove to a reference point, but visually it appears correct. I noted 5 areas where the EAI hammer differs from an orignal Steyr, one or more of which may cause this interesting hesitation.
Area 1 on an original Steyr has a compound radius. It is absent on the EAI. Area 2 on the EAI is flat. On the Steyr it is raised, which reduces friction on the inside left of the lower receiver. The overall width of the EAI and Steyr is the same. Area 3 on the Steyr is a radius, on the EAI is a sharp step. Area 4 on the EAI appears to be machined with the side of an end mill parallell to the hole and is concave. On the Steyr it appears to be machined with the face of an end mill perpendicular to the hole and is flat. Area 5 on the EAI is flat, on the Steyr it is concave to match the contour of the rat tail on the bolt carrier. None of these differences by itself seem to cause the hammer to hesitate in returning forward. It could be solved, perhaps, by applying lapping compound to the bearing surfaces and dryfiring a hundred times. It could also be the relationship between the bottom rear of the sear and the disconnect shelf on the trigger. Perhaps this relationship places increased upward pressure on the bottom of the hammer in front of the sear notch ("hammer bent"). I will fiddle with them more later and see what happens.
Despite this hesitation, the weapon went "bang" with every pull of the trigger with live ammo. It performs as advertised.